Search This Blog

Saturday, September 20, 2014

Big Top Baby Quilt


So I received my 10 degree wedge ruler from Amazon in the mail:


So excited!  I was tossing around ideas of what to make with it.  Its main purpose is to make tree skirts, because when you cut out 36 pieces, it makes a 50 inch circle with a hole in the middle.  I, however, wanted to make a round quilt.  When I found out a friend was planning a circus theme for her baby's nursery, the light bulb went off in my head.

My super-awesome hubby helped me pick out some fabrics.  I thought I'd go all-out and spring for the good stuff, so this quilt is made almost entirely of Robert Kaufman Kona Solids. 

We aren't going to find out Baby Stacy's gender until he or she is born (love it, that's how my parents did it with all three of us!), so I had to go with gender-neutral colors.

Obviously, I was going for the circus big top look, but I kind of wanted to stay away from the traditional red and white.  I couldn't find a nice gray at my fabric store (I'm sure the Ohio State fan parents would have loved that!), so I went with a nice neutral beige.  In the end I love the pairing because it gives the quilt a more vintage-y look.

So step one is to cut out 36 pieces.  In this case, I cut 18 of each color.


Look at those big strong hands holding the wedge ruler in place for me!  My husband is truly the best! <3


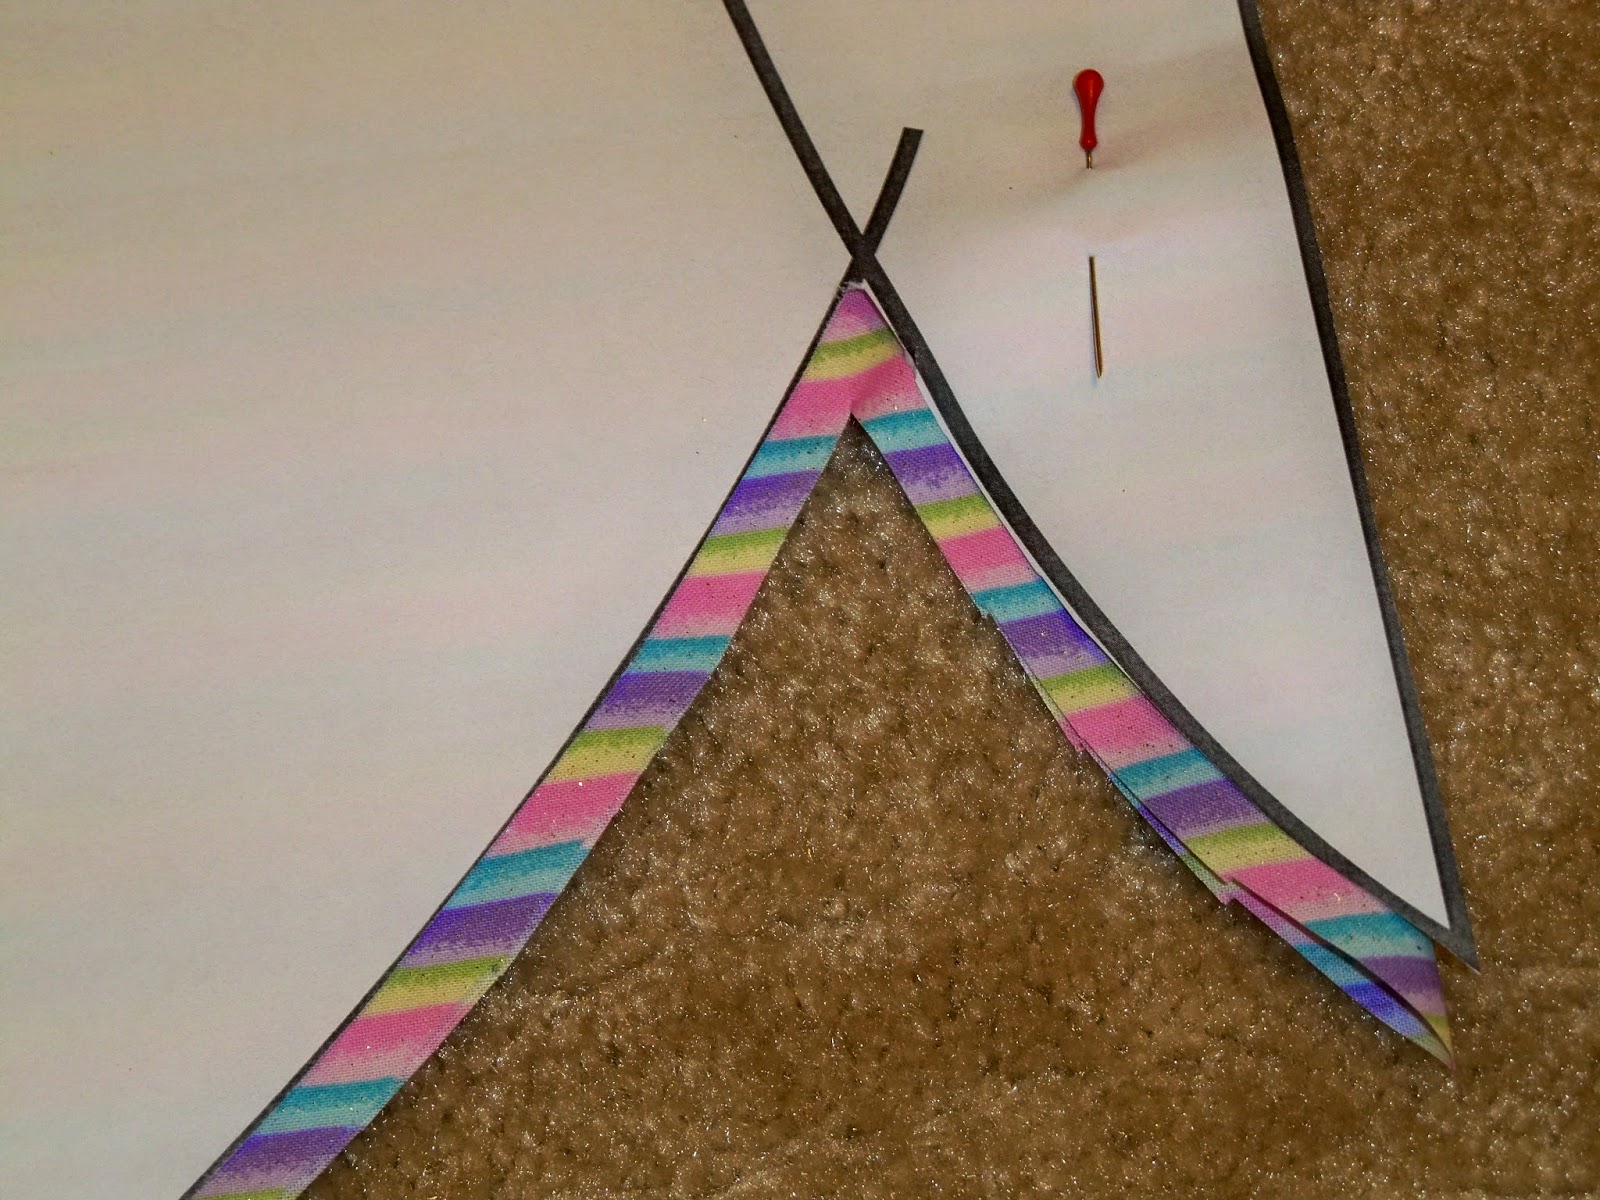
When you're working with two alternating colors, piecing this quilt is a snap.  I made sure I matched the two colors exactly the same way when pinning (or in my case, wonder clipping) them for sewing. 


After joining all 18 pairs, I made 9 bunches of four each, then 3 bunches of 12:  Here's how they look on my design wall.  Once again, all of this piecing is a snap because they are long, straight seams, and all of your pieces are identical.


It was really quite thrilling to sew the last seam.  All of a sudden, we have a circle!  It was too big to photograph on my craft room floor, so I had to take over the loft :)


Now what to do with that hole in the middle?  Cover it up, of course!  I wanted to find a circus image to applique in the middle.  I found this website with free downloadable coloring pages and printed out two copies of this cute, but simple, elephant. 

I printed two copies to make cutting out the template simpler.  I cute the elephant itself out of one page, then his accessories (the ball and his little ruffle) out of the second.  I traced the elephant and his accessories (backwards!) onto the back of some Wonder Under.


Following the product instructions, I fused all of the elephant pieces to a piece of the leftover red fabric.  I zigzag stitched all around the applique pieces.  As you can see, I also drew on some lines that better define the elephant's features in washable ink to aid in the zigzag stitching.


After I outlined the applique pieces by machine, I hand embroidered the elephant's eye to make him complete.  Don't ask where his tail ended up at :)


Using a dinner plate (I'm regretting not keeping that compass from 9th grade geometry class!), I traced and cut out a circle out of Reynold's freezer paper that would comfortably enclose the entire applique design. 


Laying the freezer paper shiny side down, I ironed the circle to the wrong side of my applique piece, and cut around the paper using a scant 1/4" or so allowance.


I simply folded the seam allowance under and whip stitched the circle to the middle of the quilt.  When there was only an inch or two left to sew, I pulled out the freezer paper through the opening.

My husband loved the idea of using fleece for the backing.  I went with it, because it's easier (fleece comes 60" wide, so no piecing!) and a bit more cost effective, too.  One bonus is that you don't need batting if you use fleece as the backing.  I opted to use polyester batting in addition to the fleece because I wanted this to be ultra plush.  I made the quilt sandwich like any other.


Now onto the fun part: hand quilting!  I opted to echo quilt 1/4" from the seams so the quilting would be visible.  This was my first time quilting with Guterman hand quilting thread, and boy, was it a dream to sew with!  I went with contrasting colors on each section:


Once the quilting was done, I had the challenge of binding the quilt.  I really wanted to add a pop of color to the quilt, but I just couldn't find the right fabric.  In the end, I opted to use the leftovers from the quilt top.

Confession time: I used my Binding Buddy ruler for the first time and horribly hacked up my big-enough piece of fabric.  What to do?  Scrappy bias binding it is!


Once I got the hang of it, the Binding Buddy ruler is quite nice.  It's 2 1/2" wide, so it cuts your standard strips, and it helps you cut them exactly on the bias if you desire.  Here, I've joined together short scraps leftover from the quilt top.  The Binding Buddy also results in pieces with 45 degree angles on each end, so piecing together a continuous strip is a piece of cake.


Of course, you press the binding in half as usual.  I really just wanted to show y'all my new ironing board cover :)

Bias binding is crucial to a round quilt like this one, so don't skip that step.  The binding needs to be able to stretch around the curves.  I used my walking foot to attach the binding to the front of the quilt, and whip stitched it to the back by hand.


I hand embroidered a label with some cool variegated embroidery floss I found:


And the quilt is done!


It's far from perfect, but I hope Baby Stacy enjoys it for a long, long time.  Until next time, God Bless!
post signature

Monday, September 15, 2014

A gift to myself

So I finally made something for yours truly:  the Beatle Bag!


I purchased this kit at Heart to Heart in Winter Haven.  The kit included the complete, full-color instructions on how to make the bag, as well as the plastic zipper inserts you see in the photos. 

The ladies at Abbey Lane Quilts are super-nice.  When I had a question about where to purchase an item needed to complete the bag, they emailed me back right away.  Gotta love rapid responses! 

I've been wanting an actual portable sewing kit for a while now, so I was psyched to get this done.  The pattern is mostly fat quarter friendly, so I just raided my stash for some coordinating fabrics. 


The inserts are much roomier than they appear!  I still have four empty slots in my bag, but I'm sure I'll find more stuff to tote around in it. 


Here's what it looks like on the outside:  (I really need to get better at taking photos!)  Can you tell that I love pink and purple?  I love it!  The only addition I'd make to this bag is maybe a little Velcro closure/strap at the tops of the padded pockets.  My scissors have a tendency to fall out if I grab the bag exactly the wrong way.  I'll have to wait and see if that little problem is corrected when I completely fill the bag.  I have a hunch that this thing gets really snug (in a good way) when all the pockets are full. 


That's it for now.  I have some new blocks finished up on my long-term project that I'll show off in a few days, as well as a few gifts I've almost completed.  Thank you for reading!  It brings me much joy to know you care enough about me and/or these things I'm making to take the time to read about them.  Until next time, God Bless!
post signature

Sunday, September 7, 2014

For the Happy Couple


So some friends of ours decided to tie the knot, and we couldn't be happier for them.  I realized I just HAD to make something for them.  She was already excited about a quilt she plans to make from the place mats used at the reception, so I thought I'd make something a little different--potholders and an apron!  My friend Erin does a lot of cooking, so I figured it'd be something she could actually use.  Plus, you can't really have too many potholders OR aprons.

I already had an idea of the colors and prints she likes, so I found these matching fabrics at Hobby Lobby.  He's a Smith, so I decided to go with a monogram S.  

I printed out a letter S using a standard word processing software (I personally use OpenOffice) and traced it (backwards!) onto some Wonder Under and fused it onto the gray fabric.


Cutting and fusing is my favorite part.  Too bad it couldn't stay this way--these items have to be highly washable.


I set my Singer Simple machine to a short, narrow zig zag stitch.   Curves can get pretty tricky!


Now, how did I know what to cut for these potholders?  My loving hubby brought me a souvenir from his trip to Maine:


The book has a cute collection of projects that features a unique way to frame objects.  Instead of traditional binding, you construct a frame with the help of a special ruler (or template that's provided in the book).  The pieces look like this before they're assembled.


When the frame is assembled, it looks like this, with beautiful mitered corners:


I then proceeded to "stuff" the potholders into the frame.  If you're curious, the potholders are made of two matching layers of fabric, with polyester batting and Insul-Bright in between.  I quilted straight lines by machine with the help of my brand new walking foot.  


Now for the tricky part:  to line everything up so you only have to sew one seam:


It took a few tries, but they look alright:


I found a cute tutorial for making an apron from scratch at Sugar Bee Crafts.  I'll admit, I was rather skeptical when I blindly started following her cutting instructions, but it came together beautifully.  The only mod I'd make is to cut wider ties, as she suggested.

I affixed a homemade label to the inside:


Hello, crooked stitching!

And here's the final product:   Not too shabby!


And my I've-had-too-much-caffeine-and-now-it's-midnight face modeling my creations:


Maybe next time I'll have more courage and attempt a ruffle at the bottom.

But here's the happy couple:


Their wedding was absolutely gorgeous!  I hope the newlyweds enjoy these gifts for a good while.


I've got a few more things up my sleeve, so until next time, God Bless!

post signature

Sunday, August 31, 2014

Baby Butterfly Quilt

At long last, I get to share this:


Thanks to the folks at Jo-Ann for the free pattern and instructions.  You can find them here.

The pattern prints on one sheet in PDF format, and the instructions indicate that you must enlarge the wing/body portion of the pattern 800%, and the circle/antenna portion of the pattern 200%.  How do you do that without paying for an enlargement at the print shop?  I used the PDF reading program called Foxit.  It's free, and you can download it here.  When you're ready to print, simply go to File --> Print.  Under the Print Handling section, select "Tile Large Pages" and indicate the Page Zoom percentage you'd like to use.  In this case, I used 800%.  


As you can see, I opted for a page overlap of 0.005 inches and added cut lines and labels.  This helped me cut out and match my sheets of paper a little easier.  When you're printing an image this large, it can be difficult to piece it together otherwise.  

BEWARE:  I printed the entirety of page 2 at 800% which resulted in a whopping 72 pages!


Check out this fat stack of paper.  I ultimately didn't mind because I happen to have lots of extra copy paper laying around, and the image is mostly blank space, so it didn't use a lot of toner.  I ended up reusing all of the unused pages.

Now for piecing the pattern together:  I quickly realized that the entire enlarged printout would take up more than the available space on my floor.


Here's where choosing the "label" option came in handy:  this option prints a small label that indicates which tile the current sheet of paper represents.  For example, tile 1,1 is the first tile in the first row, and 2,1 is the second tile in the first row, etc.  Once I figured out the pattern, I simply pieced it together at my work table without the necessity of laying out the entire design.  I cut off the overlapping portions and taped the sheets together to form the portion of the pattern I needed:  


I then re-printed the design at only 200% for the remainder of the pattern, which required much fewer sheets:


My mother helped pick out some coordinating fabrics, and off we go:

I cut out the body pattern, reinforcing with additional tape where it was needed:


Wow, this picture makes my carpet look dirty!  I promise, it's not.  Just in case, I vacuumed before the remaining shots: :)


We found this super cute and super girly striped fabric (with glitter!) that I'm using for the backing.  Lining up the backing fabric on a fold, I pinned the pattern to the fabric and cut out the body, leaving a 1/4" seam allowance all around:


That's really the hardest part to remember: always include the seam allowance!  Now, after all of that work putting the pattern together, it's time to cut it apart!  I love the glitter stripe so much I decided to use it for the butterfly body, too.  Once the body was cut out (I almost forgot my seam allowance again), I auditioned the other prints I purchased for this project and decided where to place them:


Once again, folding the fabric in half, I pinned and cut out my pattern pieces.


 The curves on this project are a little tricky to sew, so I used tons of pins to hold the pieces together as I pieced them together by machine.  I was also diligent about transferring all of the "hash marks," or registration marks, as Jo-Ann calls them.  It would have been a disaster piecing the wings together without those marks, so don't skip that step!


One wing down, one to go!


Now the second wing is complete!  It's coming along nicely, no?


 Then, using paper-backed fusible web (I use Pellon Wonder Under), I traced out the circle templates and fused them to the wings.  Apparently, I was very eager to take this photo because the wings are still damp from fusing the circles.


Now for the antennae:  I went with blue because there was so little blue in the wings, and I think that heart print is just adorable.  I cut out four pieces (two sets) of the antenna shape using the template as a guide.


Using a modified quilt sandwich, I sewed on the batting using a 1/4 inch seam allowance.  Gosh, curves can be tricky!


But not too shabby for someone with limited experience on the machine!


Trimmed, turned, and pressed, I basted the antennae to the butterfly after I attached the wings to the body with a 1/4 inch seam.


Now it's sandwich time!  It's a modified quilt sandwich again, because this quilt will not be bound--it will be turned.  The batting goes on the bottom, followed by the back and the front, right sides together.  


I pinned the three layers together while I trimmed the batting to size.


I sewed another 1/4 inch seam all but a few inches around (I opted to leave a 7 inch opening at the bottom open for turning), turned the quilt right side out, and whip stitched the opening by hand.  Voila!  Now it's time for the quilting.


I ended up blanket stitching by hand around the circles for added fray protection after the fact.  I'd recommend you do it beforehand.  I quilted this by hand using a pink thread (Coats Cotton Covered--I DO NOT recommend this thread!) mostly in the ditch.  I added some segments to the body as well.  

I hand embroidered a label for little Alizabeth:


Here's the final product: (with a preview of the pillow!)


Confession time:  I messed up the first time I bought the backing fabric and did not purchase enough.  Needless to say, I had to return to Jo-Ann to buy enough.  What to do with all this extra girly fabric?  Well, a matching gift, of course!

I found a 12 x 12 pillow form on sale at Hancock one day and thought it was just the right size for a little lady.  This gift is for little Alizabeth, so I though a monogrammed pillow would be nice.  I printed out a template--this is just a standard word processing font: Curlz MT.  I adjusted it to make sure it would fit on the pillow form.  


I had some white felt laying around in my stash and fused it to the front panel using Wonder Under.


I wanted this to look a little more professional, so I thought a satin stitch would look better than the traditional blanket stitch for applique.  One problem--no way was I going to satin stitch it all by hand.  I have a Singer Simple machine, so my options were pretty limited.  In the end, I went with a zigzag stitch.  I set the stitch length at the shortest setting, and set the stitch width at one of the widest settings. 


After testing it out on a scrap piece of fabric, I proceeded to zigzag stitch all around the A by machine.  Some of those corners and curves were  a bit challenging, but overall, I think it turned out alright. 


I fused a piece of fusible fleece onto the back of the panel, and quilted a simple design of intersecting lines by hand.  I simply skipped over the applique while quilting, but I guess I could have appliqued the letter afterwards.  In the end, I don't think it made a difference. 


I made the back half of the pillow cover following some instructions I found for an envelope closure. I attached a binding as you normally would to finish it off.

And here's a pic of me beaming over my most recent creations.


Until next time, God bless!