Search This Blog

Thursday, December 11, 2014

Stampin' Up!


A few months ago, I went to the crafter's yard sale at my church and bought a handmade card for my sister's upcoming birthday.  I also entered a drawing to win a free card making class for me and seven of my friends.  Well, you know what comes next--I won! 

I set it up for this past week, but apparently it wasn't a good time--only one other person came with me, and that was my mom!

That didn't affect the level of fun and craftiness, though.  Check out the beautiful cards we made!  Beverly provided everything for us--she would normally charge $15 per person for the class, but she graciously did this for free.  I might have just caught the stamping bug.  I know my mom did! 

I'll keep it short and sweet this time.  Take a peek at these pics, and God Bless!


post signature

Monday, December 8, 2014

Fast and Easy Baby Quilt


My grandma lives with my parents part of the year, and one day she excitedly shared with me that she was finally going to be a great-grandma--my little cousin was expecting! 

I immediately began to mull over the possibilities of a gift for this new addition to my extended family.  A quilt?  A stuffed animal?  Every baby deserves a handmade gift, after all.  Of course, life gets in the way, and time snuck up on me.  I found out on Thanksgiving that my grandma would be leaving for her "shift" in Puerto Rico on December 10th.  I only see grandma on the weekends, so that gave me two weeks to whip something up if I wanted her to deliver the gift in person.

The following week, during a break between hearings, I made a quick detour to the Fabric and Sewing Shop in Sebring.  Sandy, the proprietor, is just the sweetest lady imaginable.  She quickly ushered me in, showing me all the new, neat things she had to offer, and this panel caught my eye:

(Pictured here already pin-basted and ready to quilt)

"Perfect," I thought.  I don't know whether my cousin is having a girl or a boy, and I was really short on time.  Sandy hooked me up with some matching flannel for the backing that is oh-so-soft and oh-so-sweet:

I wish you could feel this!
All fabrics come from the Susybee collection.  I know it's significantly more expensive, but I have yet to regret buying higher quality fabric from my local quilt shops.  It's just that much nicer, and in the case of this collection, all of the prints coordinate perfectly.  Don't worry, though--I do my fair share of bargain hunting at Joann and Hancock, too. 

Well, you already saw me layer and baste the quilt: I opted for an 80/20 cotton/poly blend batting.  So far, that's been my favorite to work with.  You'll definitely hear it if I change my mind. 

I'm getting all geared up for new project on Saturday morning (with a Sunday deadline!) when this arrives at my front door:


Oh Lordy!  My new sewing machine is here!  It's my early Christmas gift from the hubby who saw me continually get frustrated with my Singer Simple.  I don't care what people think about Singer nowadays, I just couldn't pass this machine up.  It has all the bells and whistles of a machine three times its cost, and there seem to be many very happy customers. 

I was gearing up for its arrival by watching series of YouTube videos that demonstrate how to use different features of the machine.  And yes, I also downloaded the operation manual and read it.  Needless to say, I was ready to sew right out of the box. 
And here it is in action:

Isn't she lovely?

I immediately attached my walking foot and started machine quilting this baby.  Which begs the question: how much "hand" must go into something "handmade?"  After all, I trimmed all of the pieces by hand, basted the quilt by hand, and guided it through the machine by hand.  I also finished off the binding by hand, but I somehow feel like a bit of cheat for calling it "handmade."  I guess I just need to come to terms with the difference between "hand sewn," "hand quilted," and "handmade." 
 
One neat feature of the Singer Quantum 9960 is the built-in alphabet embroidery.  Check out the label I made:


All in all, this quilt only took a few hours to make because there was no piecing involved, which makes it a good option for a really fast, but homemade gift.  Now I'm glad I have a few hand-me-down panels in my stash for other last minute gifts. 
 
Here's the final product:


I kept the quilting far apart at Sandy's advice, because it'll keep the quilt softer and less stiff than if it was more densely quilted.  I'm pretty proud of this one, y'all.  Until next time, God Bless.

post signature


Table Runners Galore!

Okay, so maybe just two of them!  I proudly present the Too Square Table Runner and the Noel Table Runner:


The first one also happens to be my very first table runner ever.  This one was made from the Eazy Peazy Quilts pattern Too Square Table Runner.  I was all geared up to make this table runner along with my guild sisters at our November monthly sew day, but I punked out and didn't feel up to leaving the house that day.  This led to it being half-done for quite a while. 


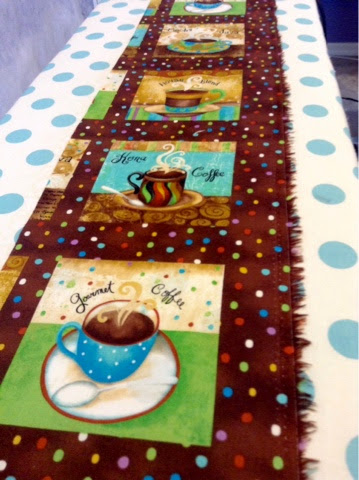
Anyhow, I've had this super-cute coffee themed fabric laying around for a while that I bought at Heart to Heart's location in Winter Haven. 


This isn't the project that I had in mind for it (its intended ultimate use is a super-secret Christmas gift for someone I love very much!), but I purchased an entire yard of the fabric, so I have plenty for both. 

I fussy cut the squares for the runner...


...and it really was easy to put together.  I normally can't get my patchwork to quite match up correctly, but this wasn't hard at all!


To save time, I opted to machine quilt this piece by stitching in the ditch, and only where the seams were obvious.  I opted not to quilt the yellow-on-yellow seams.  This will just sit on our little coffee buffet, so I'm not too concerned with the quilting being far apart.

Then comes the binding: I really wanted to make this project completely from my stash, so I went with this really bright green broadcloth I had tons of.  I got really lazy, so I used Steam-a-Seam (which I now absolutely love, by the way) to iron on the binding.


And here it is!  My very first table runner.


Now for some Christmas fun: I scored this fun book by Nancy Halvorsen:


The projects inside are super-adorable!  There's even a soft nativity that I'm itching to make.  At this point, that'll have to wait for next year.  Or maybe a Reyes gift for my mom???? Hmm.  Anyhow, I started with the table runner. 

I traced the templates onto freezer paper. 

Does this count as a "selfie?"
I then roughly cut the templates out and ironed them on the wrong side of my fabric, since the patterns are presented in reverse in this book. 


I'm still not quite used to using freezer paper, but gosh, did it come in handy this time!  So far, it's been great to use for templates where you don't need to use fusible web, or you don't want to trace a template directly onto the fabric. 
 
 
I did fail to follow the instructions on this one--you are supposed to fold your fabric, right sides together so your back and front are cut out at the same time.  I took the longer path of doing them individually.  Lesson learned.
 
I pinned all three layers together and decided to sew right through the freezer paper, then trimmed the letters before removing the freezer paper.


Peeling the paper was actually kind of fun, but a little bit messy.  Not my favorite method, but it did ensure that my seams were accurate, which I appreciate. 

The "O" in "NOEL" is the main feature of this table runner.  It is prepared with fusible web on contrasting fabric. 


I chose a Robert Kaufman Japanese print that has a gold leaf-like pattern throughout, so I thought it'd be nice to embroider it with some gold metallic thread I inherited from my mother-in-law when they moved.

This was my first time using metallic thread.  Sandy from The Fabric and Sewing Shop in Sebring warned me that you should use a special needle for metallic thread if you plan to use it in your sewing machine.  I opted to sew this by hand, so I used a regular embroidery needle.

A few things I learned about metallic thread:

  • It frays, it frays, it frays!  I started cutting shorter lengths of thread because the wear on the thread as it passes through the fabric encourages fraying. 
  • It gets all over the place!  This is definitely something to work on at home, not on the go.  I'm still picking up tiny filaments of gold thread from the floor of my sewing room.
  • Use a thread conditioner.  I used Thread Heaven, but beeswax should work, too.  I noticed a HUGE difference in the ease of sewing once I coated the thread. 
  • It might be a bit of a pain, but it's worth it!


Every time I thought about cursing this thread, I reminded myself that I was stitching around an image of Baby Jesus, and that calmed me down.  My NOEL table runner is now proudly displayed on the door of my office.  One more tip: I ended up having to use double-sided tape to keep the table runner looking nice on my door.  If I were to make it again, I would use some sort of interfacing (maybe foam, or Peltex?) to keep all of the letters nice and stiff without additional support. 

What do y'all think?  I had a good time making these.  As I write this, I've already completed another project, so expect another update soon!  God Bless.


post signature


Friday, November 21, 2014

Cam the Camo Bunny

Told y'all I had some stuff in the pipeline!  Check out this little guy!
Cam the Camo bunny
 
 
Yes, I made him!  I named him Cam, because he's partially camouflaged.  I got this pattern care of Jo Carter for Love Patchwork and Quilting Magazine.  Isn't he darling?
 
I'm sure the name Cam is only temporary, because I'm not keeping him.  I know, it'll be hard to part with him, but this gift is for little Dawsen.  Dawsen is a co-worker's first grandchild who (at least a few months ago) is completely enamored with stuffed animals.  Dawsen's family is very outdoorsy, hence the camo print I chose. 
 
Me and Cam in the Kelly Courtroom
 
This was my first time working with linen, and it was rather interesting.  Per the instructions, I washed and dried the linen before cutting into it.  Oh my--I had heard about how wrinkly linen can get, but I just didn't know.  It took a LOT of starch and a lot of steam to get the linen looking smooth and beautiful again, but I think it was worth it. 
 
The linen was easy to cut and pretty easy to sew.  The only issue I ran into is that the seam allowances were very small, and some of the seams began to come undone.  I remedied that by using a larger seam allowance throughout. 
 
Now for the construction of the bunny: the pattern was mostly clear, but I had one major issue: when it came time to sew the front of the head to the back of the head, the pieces just didn't match the way it looked like they should.  In the end, I just kind of fudged it, and it turned out quite alright. 
 
One thing I didn't realize--making dolls is kind of creepy.
 
Limbs everywhere! 


Someone please help me!

I had a few good laughs in the midst of my frustration looking at the random body parts laying around.  In the end, Cam came out pretty cute.  I hand embroidered his face as well as Dawsen's name on the back. 

Look how handsome!

So cute with his quilted cotton (well, mostly polyester) tail!

 
I'll have to make some girly ones next, I think.  Until then, God Bless!
post signature

Tuesday, November 18, 2014

Learn Something New


Wow, it's been over a month since I've updated the blog.  I know, I'm such a slacker!   I'm so bogged down in my unfinished projects that I really haven't finished anything in a while.  With a few exceptions:  I made this cool triangle caddy last week at my quilting class:

I love those buttons, don't you?!


Robin's plan for this session of her class is to teach us one small gift every week.  I'm so psyched about this because it's the type of sewing I'm more comfortable with, but I'm still learning new things.

One thing I learned from this particular craft: my Singer Simple has to go.  It's been great to learn on, but it just doesn't have the oomph I need.  For example, this triangle caddy calls for Peltex Sew-in interfacing, which is really thick.  While it fed through my machine smoothly, when it came time to sew the edges together, my machine locked up and refused to sew.  They just don't make them like they used to.  That being said, I'm on the lookout for something new (to me).  Between you and me, I've got my eye on my mom's Kenmore--she bought that thing at a pawn shop before I was born! It looks like this, and it's a beast!


Going back to the learning thing: I finally figured out how to sew a button on with my machine.  Face it--no one likes to sew buttons on by hand, but I did anyway because the caddy was too awkward to fit under the presser foot.

For now, I'm happily using my triangle caddy as a thread/scrap catcher, and my husband is much happier, now that my threads are in check.


And now, for my very first block of the month (BOM)!  I guess it's been so long, that I haven't mentioned that I am now a member of the Lakeland Modern Quilt Guild.  One reason for joining is for programs like these--little projects to keep you sewing, and to keep you learning. 

Ta-da!  This took me two tries to complete, and it STILL isn't what it's supposed to be.  Sewing with triangles can be tricky!  This pattern is called Treasure Hunt by Tula Pink.  Not something I would have picked out, but this is how you learn, no? 

Let's play find-the-flaws, shall we?


Sorry about the picture quality.  I turned 30 since I've last written, and  received an iPod touch for my birthday.  I thought the camera was supposed to be a big deal, but it's still not as nice the one hubby got me for Christmas 5 years ago.  Maybe I'll get better at it. 


Another little project I've completed is this little pencil case:


It uses this stuff called kraft-tex, and I'm totally intrigued!  It's paper, but it's leather?  It's easy to sew, and you can embellish it just about any way you'd like!  Pretty cool, I think.  I'll have to update y'all later on this stuff--I ordered all three colors from my instructor, so I'll get to play with it soon enough!

I can't help but leave y'all with a sneak peek of my biggest project yet:

Sshh!  Don't tell mom!


I've got a bunch more projects in the pipeline--hopefully it won't be that long before I update this again.  Until then, God Bless!
post signature
 

Tuesday, October 14, 2014

Tribute


For those that might be wondering, this is my second attempt at writing this post.  My first, beautifully-written, mind-blowing, prize-worthy post was the victim of the dreaded auto-save delete.  What follows does not read anything like the original -- it is merely a tribute.

So I have "new crafter's guilt."  What's that?  The undeniable urge -- no, need -- to make really awesome gifts for those you love the most in life because you've been making things for friends and charity, but not family.  So I found myself looking for a pattern to make for my little sister's birthday. 


Me and my little sister

It was a toss-up between Sara Lawson's Go-Go Bag and her Kennedy Bag.  In the end, the Kennedy bag won because of its larger size.  My sis is still in college, so I thought a bigger bag might be more practical. 

While my sister's (and mine) favorite color is purple, I just didn't find a print that stood out to me enough to go with a purple scheme.  I did find a fabric that jumped out at me at Hancock, so I went on my mini-shopping spree.  These before/after transformations still amaze me.  I mean, this bag was a pile of fabric and hardware beforehand!


So off I went.  Things I learned while making this bag:

  • Trace Your Pattern Pieces:  I merely pinned the pieces to my fabric and cut around the pinned template.  This resulted in mismatched pieces.  This ended up being a huge deal on this bag, and I had to make some adjustments to compensate.

  • Be Mindful of Your Fabric Choices:  As you can see, I chose directionally printed fabrics for my exterior and lining.  This made it a little trickier when cutting my pattern pieces.  If you want to avoid having to figure this out, go with an all-over print or solid instead.  It wasn't a huge deal, but it did slow down the cutting process a little.

  • Use Your Walking Foot:  I got really good at removing and attaching my walking foot.  It was a lifesaver when it came to securing the bag hardware.  Check out these handles!

It was my walking foot that allowed me to get in as close as I did, but I had to be careful to not sew over the hardware itself.  I don't even want to begin to imagine what that would do to my machine.

  • Pre-read the Pattern:  Sure, I scanned the pattern before starting it, but I didn't actually read it.  I followed some steps in blind faith because I didn't understand what was happening.  Had I read ahead, it would have made sense to me, and I would have been sewing much more confidently. 

  • Test the bag: Before finishing off the bag completely, put some stuff in it!  Had I done that ahead of time, my sister would not be texting me to adjust the placement of the magnetic snap.  I now have the fun task of figuring out how to move it without undoing it all. 

Well, I'm sure I had a lot more insight last time I wrote this, but here you go! 


I need to start taking all of my photos out here!

Interior of bag
 
 
If you want to try making the Kennedy Bag, you download the free pattern courtesy of Sara Lawson here


Until next time, God Bless!


post signature